Docker Workshop 2023
What is Docker?
Docker is an awesome technology that allows you to run your applications in containers, cross platform without installing them permanently on your system.
In this workshop we went over how Dockerfiles and docker-compose files work as well as how to build your own images and run them.
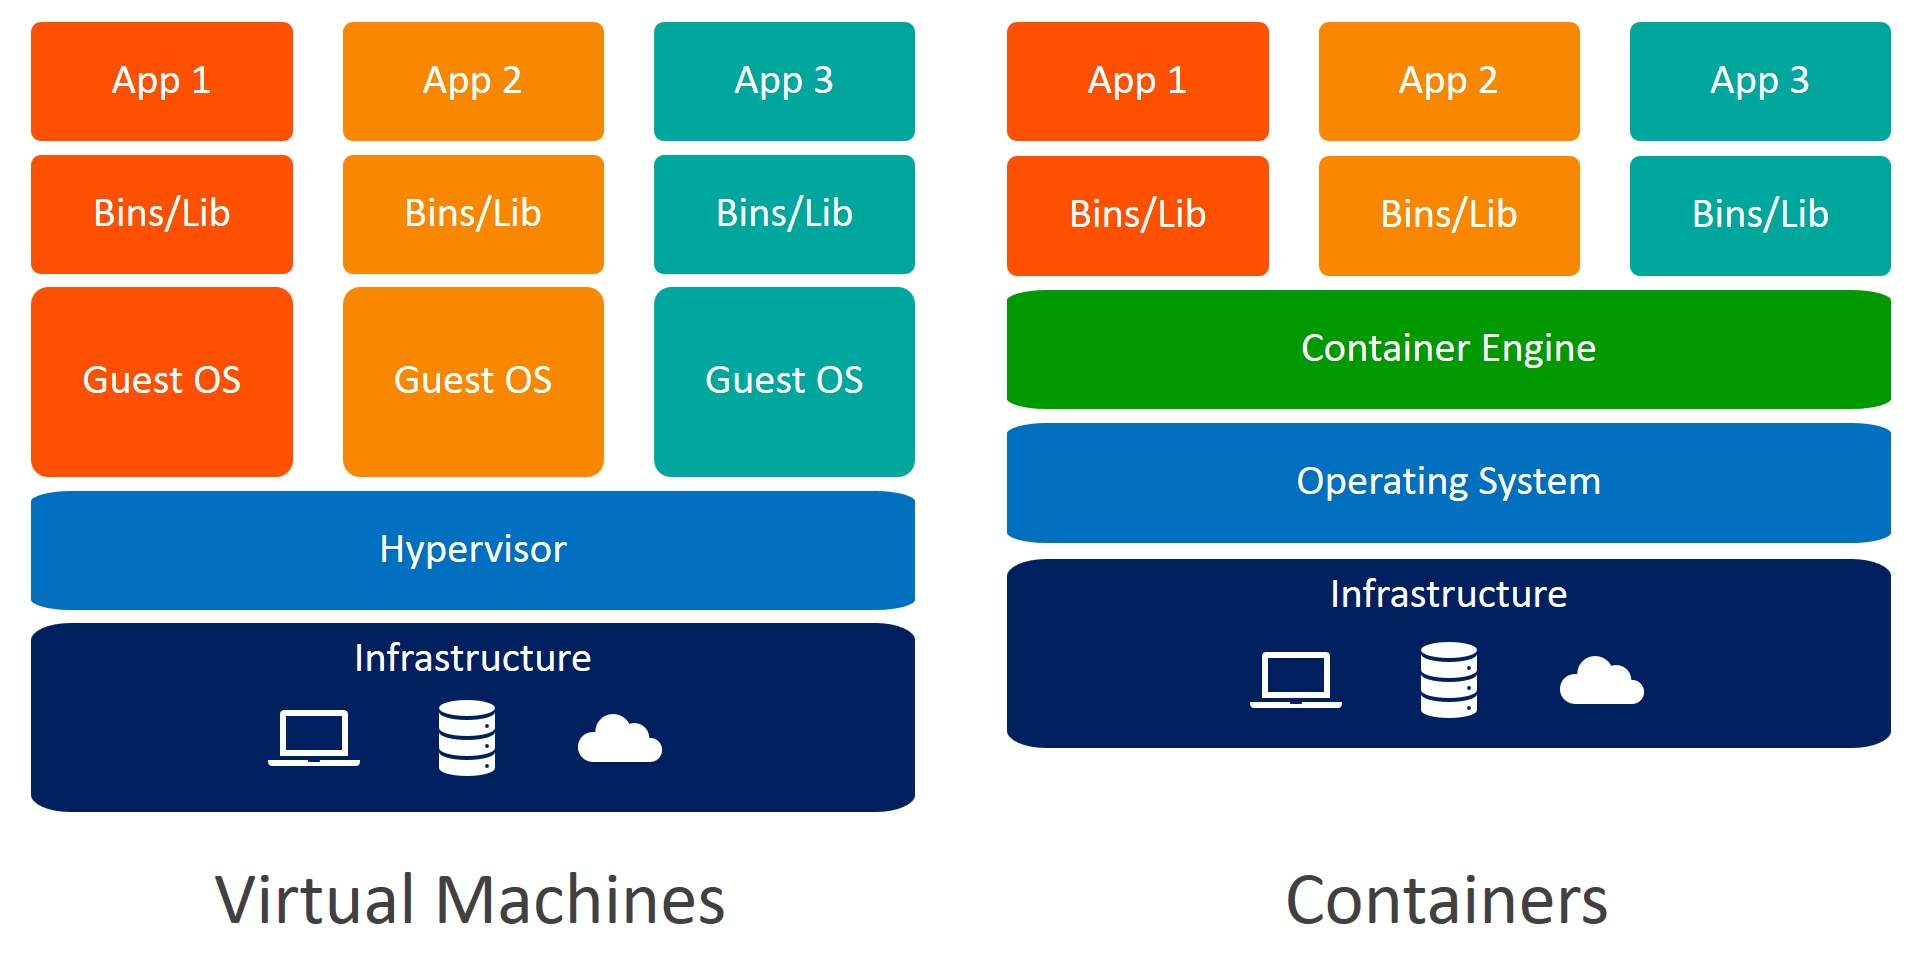
Docker containers and virtual machines have a lot in common, they both allow you to create a template for your application and run it on any system. The main difference is that docker containers are much more lightweight and can be run on any system that has docker installed.
Instead of packaging an entire operating system like a virtual machine, docker containers only package the dependencies that your application needs to run. This means that you can run multiple docker containers on the same system without them interfering with each other.
Installation Instructions
Docker
There are a number of ways to install Docker but the easiest way to install it is docker desktop. Docker desktop is a GUI application that help you manage your docker images and containers without having to use the command line.
-
Go to the Docker Desktop website and download the installer for your operating system.
-
Run the installer and follow the instructions.
-
Once the installer has finished you should be able to run docker commands in your terminal.
Dive (Optional)
Dive is a great piece of software that allows you to see the result of different steps in your docker image. It is an awesome tool to help you debug your docker images and see what is taking up the most space.
Sadly as of the publish date of this workshop, Dive doesn't behave nicely with Docker Desktop.
Dockerfiles
Docker files are the core of the software. They allow you to define the install steps of your software and the different things that it needs like ports and storage.
This workshop uses this Example Code to demo how docker files and docker compose files work and includes two different projects that need different steps to install. One easy and one harder to show the different ways that you can install software.
Basic Dockerfile Structure
# Use an official Node.js runtime as the base image
FROM node:20-alpine

# Set the working directory in the container
WORKDIR /app

# Copy the current directory contents into the container
# This ignores files listed in .dockerignore, such as the node_modules folder
COPY . .

# Set our env
ENV NODE_ENV production

# Install the app dependencies
RUN yarn install --production

# Make port 3000 available to the outside
EXPOSE 3000

# Define the command to run the app
CMD yarn start
The above file has a few different parts that are important to understand but in order to understand why they are so popular in industry we need to understand how docker sees Dockerfiles.
Each line in the file above creates a new "layer", which is like an addition on top of the previous image. Remember the old overhead projectors used in classrooms? Think of Docker layers like those transparent sheets. Each sheet has some information, and when stacked upon one another, they form a complete picture or presentation. You can add extra sheets on top to build up on your image, but if one sheet's colour overlaps with another, the bottom sheet is still there taking up space even if it's no longer visible.
Each set of Docker layers is represented by a hash, so for example when you download 2 Docker images and they both share the same core layers (e.g. both are built on top of the node:20-alpine Docker image), then those core layers are only downloaded once.
The steps are run one by one and each step creates a new layer in your docker image. This means that if you have a step that installs a dependency and then a step that removes it, the dependency will still be in your image. This is because the steps are run one by one and each step creates a new layer.
This makes it really great for caching. If the files that a step uses haven't changed then it can use the old version of the layer and there will be no difference.
FROM
The FROM command is the first command in a docker file and it defines the base image that you are using. This is the image that you are building on top of and it is the first layer in your image.
It often includes the version of the image that you are using. This is useful for things like node where you might want to use a specific version of node.
Each image publishes images with different tags. A good example of this is the nodejs image. There are variations of not just the versions but also what it was built on top of. For example node:20-alpine is built on top of the alpine linux distribution and node:20-slim is built on top of the debian linux distribution.
If you want to see which images are available you can go to the Docker Hub and search for the image that you want to use.
The page for nodejs is here.
WORKDIR
The WORKDIR command defines the working directory for your application. This is the directory that your application will be run from and it is the directory that you will be in when you run commands like RUN and CMD.
COPY
The COPY command copies files from your local machine into the docker image. This is how you get your application into the docker image.
ENV
The ENV command sets environment variables in your docker image. This is how you can set things like the NODE_ENV variable in your docker image. This is useful for variables that shouldn't be included in your applications for security reasons. It's a way of passing secrets from your host machine (your computer) to the docker image.
RUN
The RUN command runs a command in your docker image. This is how you install dependencies and run other commands in your docker image. Docker containers are most often build on some variant of linux so you can often use common linux commands if you need to.
ENTRYPOINT
The ENTRYPOINT command defines the command that is run when you run the docker image. This is how you define the command that runs your application.
CMD
On the other hand CMD specifies the default command to be run when the container is started. It can be overridden by passing a command to docker run (e.g. docker run my-image echo "Hello World"), but if no command is passed, then the command specified in CMD is run.
Advanced Dockerfiles
Because of the way that docker images are built, you can use them to build other docker images. This is useful for things like building a frontend and then building a backend that uses the frontend. You may build your application in one docker image then copy the build into another docker image and run it.
This means that the programs that you used to build the application don't need to be included in the final version of your image. This is commonly called a multi-stage build and it is a great way to reduce the size of your docker images.
# Stage 1 - Base (resources required by all layers)
FROM node:20-alpine as base

WORKDIR /app
COPY package.json yarn.lock ./

# Stage 2 - Build (dependencies required by the typescript compiler)
FROM base as build

RUN yarn install --frozen-lockfile
COPY . .
RUN yarn build
# --production removes the devDependencies from the node_modules folder, making the size smaller
RUN yarn install --production --frozen-lockfile

# Stage 3 - Runner (runs the compiled code)
FROM base as runner

COPY --from=build /app/dist ./dist
COPY --from=build /app/node_modules ./node_modules

CMD ["node", "dist/app.js"]
This code is the same as the earlier example but uses a multi-stage build to bundle and transpile the code before running it.
This means that only the specific files copied from the build stage are included in the final image. This means that the final image is much smaller than it would be if you included the build tools in the final image.
Building a docker image
To build a docker image you need to run the docker build command. This command takes a few different arguments but the most important one is the . at the end. This tells docker to build the image from the current directory and look for a Dockerfile in the current directory.
This builds it and stores it on your machine.
One of the noteworthy parts of this command is the -t option. This option allows you to tag the image with a name. This is useful for when you want to publish the image to a registry like the Docker Hub or Github Container Registry (ghcr.io).
If you want to publish it to a registry like the Docker Hub or Github Container Registry (ghcr.io) you need to log in to the registry and then tag the image with the registry url.
docker login ghcr.io
docker tag docker-ts-2023 ghcr.io/progsoc/docker-ts-2023
docker push ghcr.io/progsoc/docker-ts-2023
This logs you in to the registry and then tags the image with the registry url. This is so that docker knows where to push the image to. Then it pushes the image to the registry.
That way anyone can use it or download it. I've done this for the Docker Workshop repository. You can find the images on the Github Container Registry.
Running a docker image
docker run
If you don't want to use docker compose you can run a docker image using the docker run command. This command takes a few different arguments but the most important one is the -p argument. This tells docker to expose a port on the host machine.
The -p option tells docker to expose port 3000 on the host machine and map it to port 3000 in the docker image. The first number is the port on the host machine and the second number is the port in the docker image.
Similar to docker compose you can add other configuration options like environment variables and volumes.
With environment variables you can use the -e argument to set environment variables in the docker image.
With volumes you can use the -v argument to mount a volume in the docker image.
docker-compose
Docker compose is a tool that allows you to run multiple docker containers at the same time. This is useful for things like running a database and a web server that need to talk to one another at the same time.
This is an example of a docker compose file that runs the docker image that we built earlier. It exposes port 3000 on the host machine and runs the docker image.
You might be able to see that the image url is similar to the way that git urls work. This is because docker images are stored in a similar way to git repositories. The :latest part tells docker to get the latest version of the image that has been pushed to the repository.
You can change it to a specific version if you want to use a specific version of the image e.g. postgres 14 or 15.
Docker Compose with Multiple Services
services:
  tsnode:
    image: ghcr.io/progsoc/docker-ts-2023:latest
    ports:
      - 3000:3000
postgres:
image: postgres:14
ports:
- 5432:5432
environment:
POSTGRES_USER: postgres
POSTGRES_PASSWORD: postgres
POSTGRES_DB: postgres
volumes:
- ./postgres_data:/var/lib/postgresql/data
This is an example of a docker compose file that runs two docker images. The first is the image that we built earlier and the second is a postgres database. A lot of these common infrastructure services have docker images that you can use to run them.
This makes it really easy to define a set of services and run them without any additional steps.
One important thing to note is the volumes: section. This defines how data should be mapped between the host machine and the docker image. This is useful for things like databases where you want to store the data on the host machine so that it doesn't get deleted when you delete the docker image. Docker will mount a file/folder on your host PC to a file/folder in the Docker container. So in this case, it will create and mount a folder called postgres_data next to your docker-compose.yml to the folder /var/lib/postgresql/data inside the Docker container.
Normally, it is best practice to not store anything important in a Docker container. Containers are designed to be deleted, re-created, etc, on the go. Instead, any important data should be stored in volumes, so that all containers can be deleted and then resumed with zero data loss.
Example Minecraft Server
As a bonus here's the config to quickly start up a Minecraft Server.
version: "3"

services:
  mc:
    image: itzg/minecraft-server
    tty: true
    stdin_open: true
    restart: unless-stopped
    ports:
      - 25565:25565
    environment:
      EULA: "TRUE"
      OPS: "arduano"
    volumes:
      - ./data:/data
Save it in a file called docker-compose.yml (as explained previously), then run docker compose up, and it should start a Minecraft server on the latest version of minecraft that you can connect to.
Conclusion
Docker is a great tool for running applications in containers. It allows you to run your applications in a consistent way across different systems and it allows you to run multiple applications on the same system without them interfering with each other.